

TP-Link AX1800 Setup Guide: Easy Installation Steps!
Indeed, the TP-Link AX router is the next-generation 802.11 AX wifi technology, offering an ultimate wifi experience. It is a new-age Wi-Fi 6 (802.11ax) router that has been designed to transform your internet experience with blistering speeds. With the correct TP-Link AX1800 Setup assistance, you can harness your device’s full potential.
This guide also simplifies this setup process and gets your router ready in a few quick steps. If you are also interested in learning How To Install TP Link AX1800, then this guide is for you. Read this guide till the end to get all-in-one details in one place.
Product Specifications
To begin with, the TP-Link AX1800 (usually called Archer AX20) is a high-band Dual-Band Wi-Fi 6 router with next-generation wireless connectivity. It is designed with better speeds, expanded capability of different devices, and extended coverage. Some of its main specifications are as follows:
Wi-Fi Speeds
- On the 2.4 GHz Band, it delivers around 574 Mbps
- Similarly, on, 5 GHz Band, it gives 1201 Mbps (802.11ax)
- AX1800 gives total speeds up to 1.8 Gbps.
Processor
Usually, Archer AX20 comes with a Quad-Core 1.5 GHz processor that makes the networking very fast and responsive.
Ethernet Ports
Usually, Archer AX20 comes with a Quad-Core 1.5 GHz processor that makes the networking very fast and responsive.
Antennas
Generally, it consists of 4 non-removable, high-performance antennas with Beamforming technology.
Wi-Fi Capacity
Certainly, with its dual-band technology, 4 channels, and OFDMA, it offers lag-free access across multiple devices.
Security
Compatible with WPA3, WPA2, WPA and WPA/WPA2-Enterprise (802.1x) encryption. Additionally, it offers SPI Firewall, Access Control, Guest Network, and VPN Server (OpenVPN/PPTP).
Additional Features:
OneMesh Support, Parental Controls, QoS, Alexa Compatible, etc.

Executing the TP-Link AX1800 Setup
Generally, the process of a new router setup appears to be daunting, yet the TP-Link AX1800 offers a user-friendly setup. Usually, you can install and configure your device via its web interface or the TP-Link Tether mobile application. Both processes are easy to follow and involve simple steps.
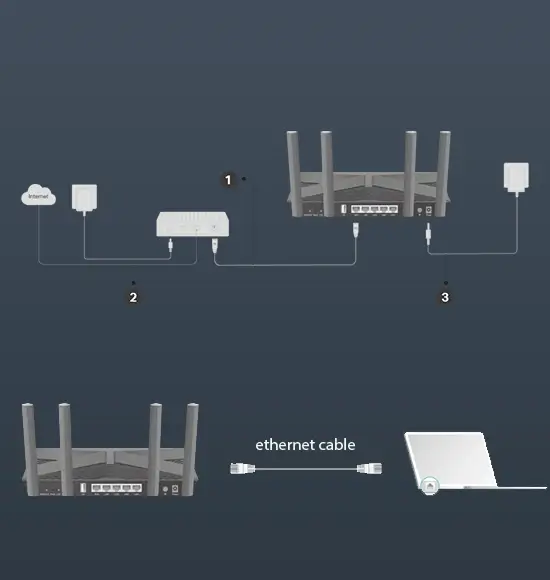
Here is How To Install TP Link AX1800 in simple steps:
- Initially, connect your TP-Link router to the ONT device via an Ethernet cable.
- Now, connect your computer to the router by means of WiFi or an Ethernet cable.
- Make sure you connect the devices to the yellow LAN port, and the wifi SSID and password are printed on the device label.
- Further, open any browser on your computer and go to tplinkwifi.net or 192.168.0.1.
- Next, log in using your default TP Link AX1800 Default Password (written on the device sticker).
- Then, complete the router setup wizard and create a login password.
- After that, select your Time Zone, Connection Type, and Wireless Settings, and then run a speed test.
- If any firmware update appears, then “Turn on Auto Update” or “Not Now”.
- Additionally, visit the Advanced tab to configure Parental Controls, QoS, Security, VPN Server, etc. settings.
- Finally, you can enjoy your TP-Link AX1800 router network.
- Reposition or install your router at the optimal place to get the maximum coverage.
- Ultimately, your TP-Link AX1800 Setup is finished.
Bonus Tips:
You can also configure and access your device through an Alexa smart device and control your device through voice commands.
Moreover, check the WLAN or internet LED on the router to confirm your internet connection.
Fixing Common TP-Link AX1800 Setup Errors
Commonly, users come across several errors while performing the TP-Link AX1800 configuration. This mostly happens due to poor internet and wifi signals, improper device placement, wrong credentials, technical glitches, firmware issues, etc. Thus, to get rid of these issues, you can try these expert solutions:

- First, check that the Ethernet cable of the modem is securely connected to the WAN port of the router.
- Next, restart your modem and router by turning them off by cutting the power off to them, after 30 seconds, connect the modem back up, then the router.
- Reconnect your devices again and re-attempt to log into tplinkwifi.net.
- Alternatively, use the correct IP address (192.168.0.1 or 192.168.1.1) to avoid any errors in TP-Link AX1800 Setup.
- Certainly, temporarily turn off any VPN or firewall software or other security extensions.
- Further, place your wifi router in a central and open place for better and higher coverage.
- More importantly, regularly upgrade the firmware on your TP-Link AX1800 router.
- Before updating, check the compatibility and version of the firmware file.
- Then, switch channels in the Wi-Fi settings of the router to avoid any interfering networks.
- Double-check the TP Link AX1800 Default Password (case-sensitive) when linking devices to Wi-Fi.
- At last, perform a factory reset by pressing the reset button for 5-10 seconds and restore default settings in order to gain access.